Monday 24 October 2022

For those interested, I ran my Into the Wilderness ACW game at my local club a few weeks ago and the pictures taken have just been posted on the club site, which is on Facebook - New Buckenham Historical Wargamers. I tried to post a direct link, but not being a user of Facebook it won't let me! I used a slightly larger table - 7 feet by 5 feet - and Union forces for this game; in retrospect it would have gone just as well on the original size of 6 feet by 4 feet, but the extra troops helped the Union commanders. When time was called, the Union had run up against the hidden Confederate temporary fieldworks, but had managed to break a couple of Confederate infantry regiments. The random events proved successful as well; one Union commander took the dubious measure of firing on a poor local farmer to try and get him to move his wagon off the road! It proved ot be a very enjoyable game and has inspired at least one gamer to try something similar with a WW2 Eastern Front game.

Some odd and ends from the painting table today.

First, a field forge model which I have had for more years than I can remember, so I do not know where it came from! The horse team, though, is made up of Colonel Bill's ever useful models which I bought at SELWG 2021 with the intention of using them with the field forge - good value draught horses and easy to paint. I had to guess how the model went together, there not being any instructions, although a quick search online for a picture gave me a rough idea. Anyway, it looks alright to me and will add an extra interest to my Sun King baggage train.


Next, some more Confederate skirmishers and a mounted orderly for my ACW collection, which is now growing apace. All Perry 28mm hard plastics. I have decided that my early attempts at snake rail fences made the lengths too long and the angles too shallow, so I have made the next batch with shorter lengths of poles and more acute angles. They look more like the ones in the contemporary pictures and photographs.


Two mounted orderlies for carrying messages on the battlefield: Confederate on the left, Union on the right, both Perry 28mm hard plastic cavalry figures.

In the rules I have been using for ACW, an old set from Jacklex Miniatures, units down to three bases count as "Broken" and automatically rout for a turn and are then removed at the start of the next turn. I thought it might be a good idea to replace them with a "Broken Unit" base, so here is my first attempt. Again, Perry figures, fleeing past a homemade tree.

And last of all, my first ACW cavalry unit, Confederate, ten figures, all Perry hard plastic figures. I found them easy to glue together and a pleasure to paint. My enthusiasm for hard plastic figures continues to grow!


And it is the first time I have ever painted a piebald horse. It came out well I think! I do not think they were very common in Europe in the 17th Century, my main period of interest, although Turenne certainly rode one.


Monday 10 October 2022

After a bit of break, war has broken out again on the continent of Petaudia. Ethonia's ambitious count, Zacocia IX, has launched an invasion of the Celerian Marches, attacking the small barony of the East March, ruled by Baroness Eblis VI. The attackers have to cross the high Trygon Mountain range to reach the East March and the defenders hastily sent delaying detachments to hold the main passes. The first action took place in Waldo's Pass.
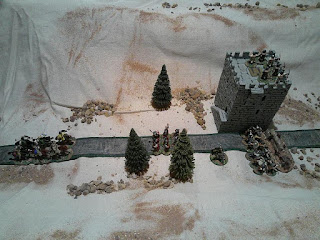
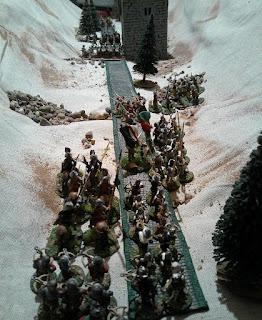
The table was not my usual type: i decided to make it look more like a mountain pass. You can see the result in the pictures. I used an old curtain draped over tins of paint (anyone remember doing that when they first started wargaming?) and scattered sand and gravel to break up the bare surface. The slopes counted as difficult ground, so movement was slow off the road. The gravel heaps were screes, so gave cover. The tower was bought many, many years ago, the manufacturer long forgotten to me. I used Dragon Rampant rules, with a few "house amendments". The figures are mostly Essex 25mm metals, with Grendel dwarves (still the best dwarves I have ever seen!), plus some odds and ends, e.g. Grenadier, Perry, Gripping Beast.
The defence had to hold the tower and the barrier for as long as possible and then pull out without having suffered more than a third of its strength in losses. The attackers had to take the tower and barrier and prevent the defenders getting away easily. These objectives made it pretty easy to play the game solo.
In the event, the defenders achieved their objectives successfully. They lost and then regained the barrier and held the tower until the attackers were hammering on the postern gate on the east side. They then pulled out before the attackers could catch them and without suffering severe losses. The attackers were somewhat hampered by the fact that their force included quite a lot of cavalry, which was of little use in the barrow pass.
The East March defence had one unit of peasant longbowmen in the tower, one unit of crossbowmen at the barrier, one unit of dwarves and one unit of mercenary light cavalry, along with one command stand - the Lord of Bonese.
The Ethonian attackers had one unit of spearmen and one of crossbowmen from the Barony of Tarpeia, led by its baroness in full armour (colours are green and red) plus a strong force of Leucadian mercenaries (colours are black and white): one unit of knights, one of men-at-arms, one of medium cavalry, one of spearmen, one of crossbowmen, one of longbowmen and one of swordsmen/axemen, all under their commander, Symmachus the Tall.
Oh, there was also a random roll each turn to allow the appearance of a "wandering monster" (in D&D parlance!). I have decided my individual monster and creature models rarely get an outing on the table, so this was a way of doing so. In this case, a stone giant. A '6' on a die meant it appeared, which it eventually did, but its actions were then controlled at random. It ended up throwing lots of rocks at the West March defenders of the watch tower, but otherwise did not have a significant effect on the battle.
Anyway, here are the photographs. The quality is a bit varied as I was in the garage for this game - loose sand and gravel is not welcome in the dining room!

Waldo's Pass, looking from east to west.
The old watch tower.

The mercenary light cavalry from the East March.
The crossbowmen holding the barrier.
The peasant longbowmen in the tower.
The defenders' commander, the Lord of Bonese with his standard bearer.
The dwarves, allies of the East March.

The leading attackers - the Baroness of Tarpeia and her spearmen and longbowmen.

The Leucadian mercenaries start to enter the pass.

Symmachus the Tall, the Leucadian commander, is the command base on the left of the picture.

The stone giant makes its appearance half way through the action.


The Leucadian swordsmen/axemen - a mixed race unit of half-orcs, dwarf, goblin,
elf, humans and a wolf!


The dwarves are about to retake the barrier as the Leucadian swordsmen and axemen reach the tower and start trying to break down the postern door.
The peasants evacuate the tower.


Leucadian knights - not much  use in the narrow pass.
The defenders are pulling back.
The attackers pile up beyond the barrier and watch tower.